Manual for CONNECTOR
1. Configuring the MT5 terminal
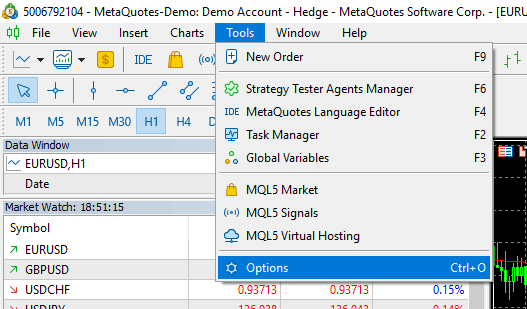
1.1. In the terminal window, in the menu bar, select Tools - Options (or press Ctrl+O).
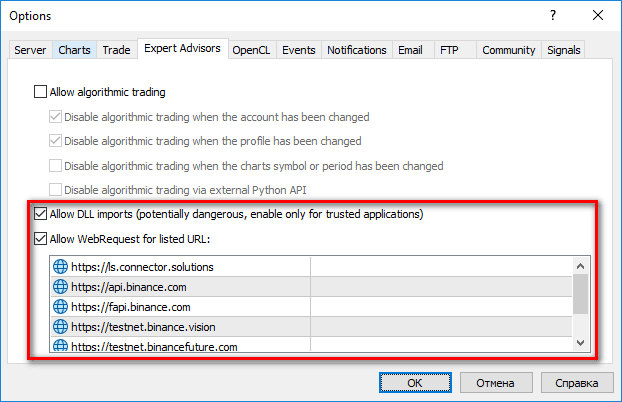
1.2. In the Options window select the Expert Advisors tab and make sure the following options are selected:
- - Allow DLL imports;
- - Allow WebRequest for listed URL.
For the latter option add the following URLs:
1.2.1. Connector Solutions server URL https://ls.connector.solutions - required;
1.2.2. Binance API endpoint URLs – required if you are going to use the CONNECTOR to synchronize with Binance:
1.2.2.1. Spot – at least one of the URLs: https://api.binance.com, https://api1.binance.com, https://api2.binance.com, https://api3.binance.com, https://api4.binance.com;
1.2.2.2. USDⓈ-M Futures: https://fapi.binance.com;
1.2.2.3. Spot Test Network: https://testnet.binance.vision;
1.2.2.4. USDⓈ-M Futures Test Network: https://testnet.binancefuture.com;
1.2.3. KuCoin API endpoint URLs – required if you are going to use the CONNECTOR to synchronize with KuCoin:
1.2.3.1. Spot: https://api.kucoin.com;
1.2.3.2. Futures: https://api-futures.kucoin.com;
1.2.3.3. Spot sandbox: https://openapi-sandbox.kucoin.com;
1.2.3.4. Futures sandbox: https://api-sandbox-futures.kucoin.com;
1.2.4. Kraken API endpoint URLs – required if you are going to use the CONNECTOR to synchronize with Kraken:
1.2.4.1. Spot: https://api.kraken.com;
1.2.4.2. Futures: https://api.futures.kraken.com;
1.2.4.3. Futures sandbox: https://demo-futures.kraken.com;
1.2.5. Bybit API endpoint URL – required if you are going to use the CONNECTOR to synchronize with Bybit:
1.2.5.1. Live: https://api.bybit.com or https://api.bytick.com;
1.2.5.2. Sandbox: https://api-testnet.bybit.com;
1.2.6. OKX API endpoint URL – required if you are going to use the CONNECTOR to synchronize with OKX: https://www.okx.com.
1.3. Click the OK button to save the changes.
2. Configuring the IB terminal (TWS)
The following steps are only necessary if you are going to use the CONNECTOR to synchronize with IB.
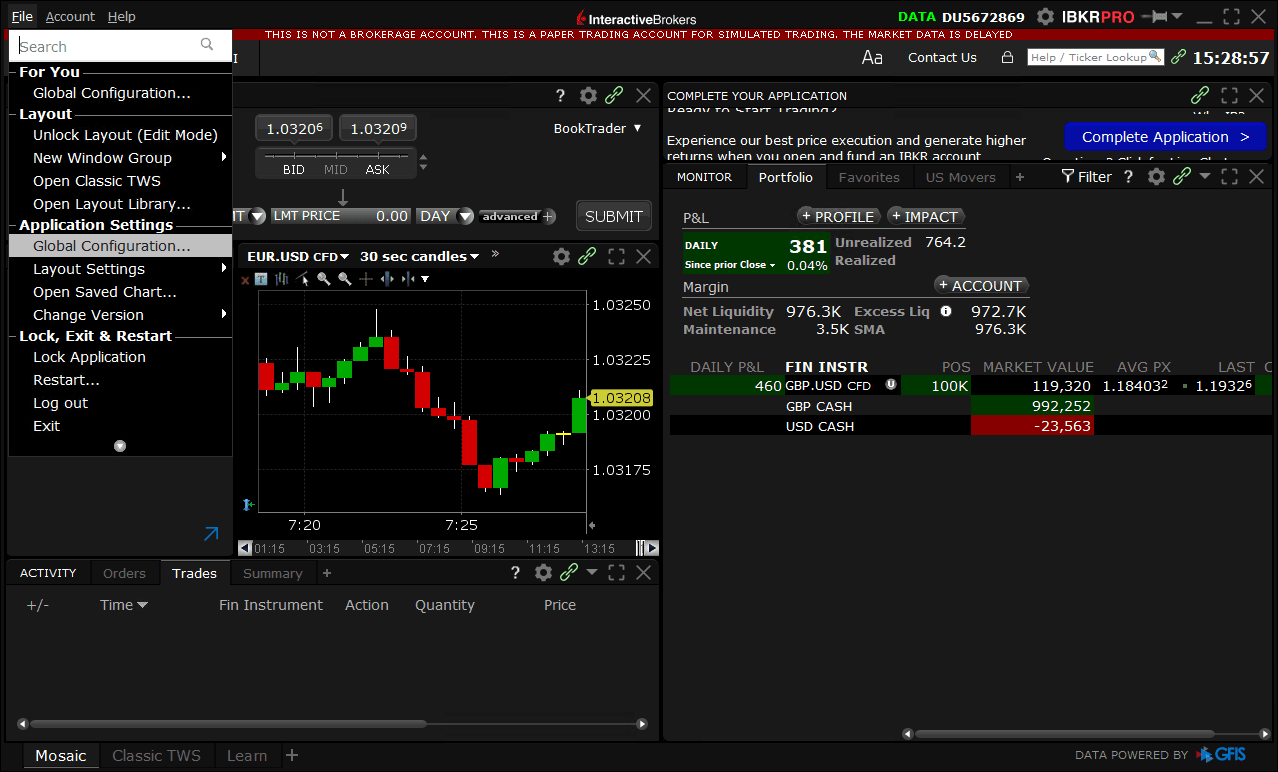
2.1. In the terminal window, in the menu bar, select File - Global Configuration.
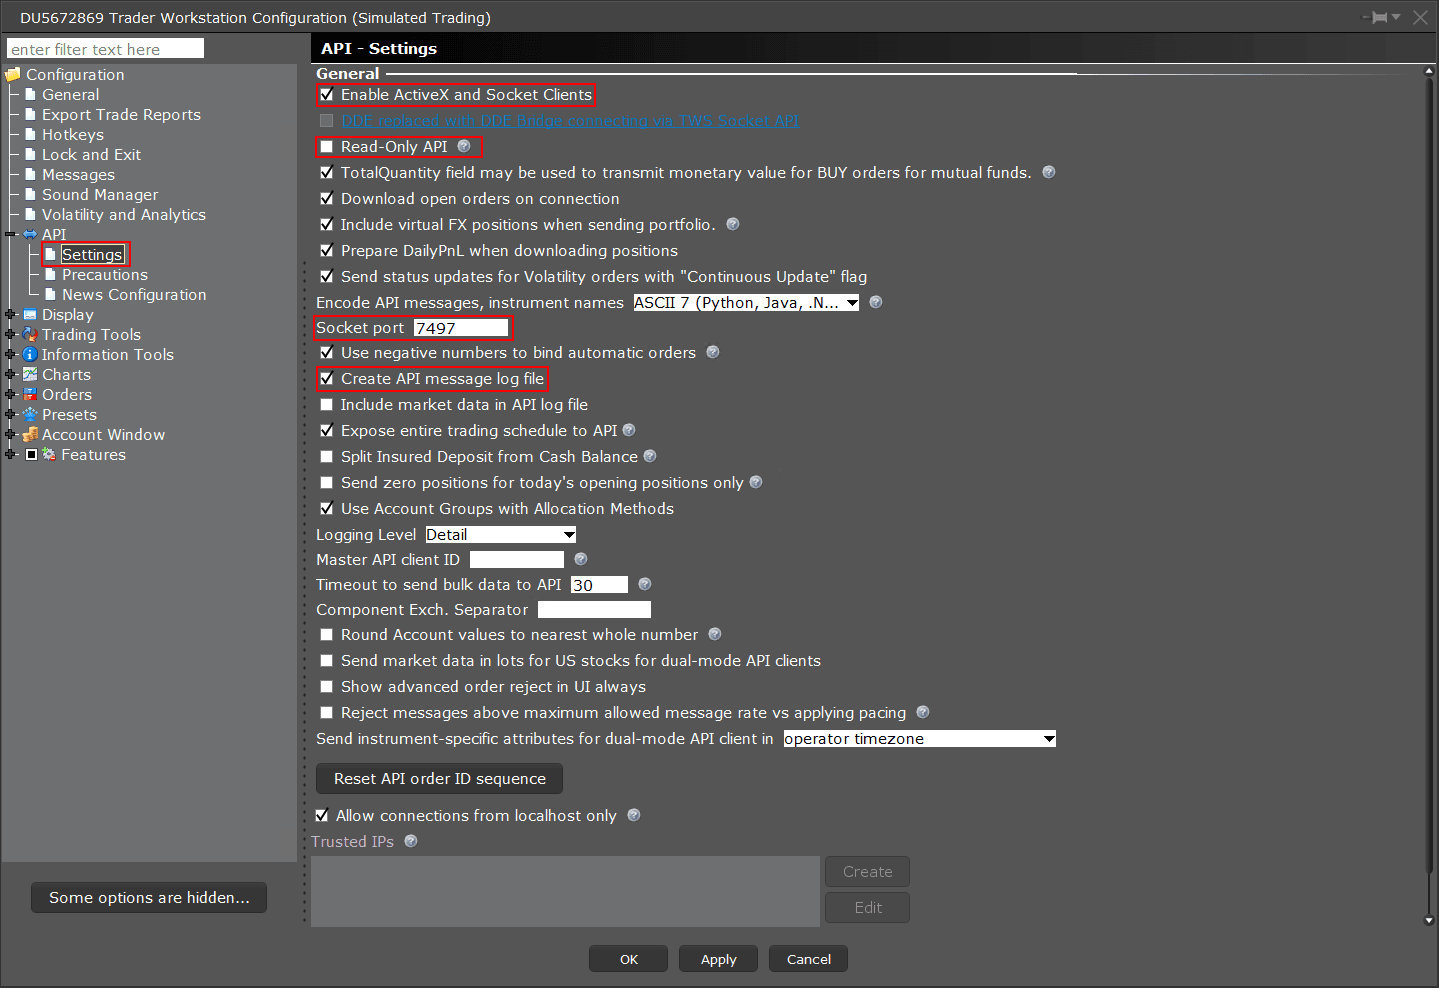
2.2. In the settings window that opens, on the left in the navigation bar, select API - Settings.
2.2.1. Make sure the Read-Only API option is not selected and the following options are selected on the right in the settings panel:
- Enable Active-X and Socket Clients;
- Create API message log file
2.2.2. Set the settings values:
- Socket port – the port through which the CONNECTOR will connect to the TWS;
- Trusted IPs – IP-addresses to which the CONNECTOR will connect. It is not required if the connection will be at 127.0.0.1.
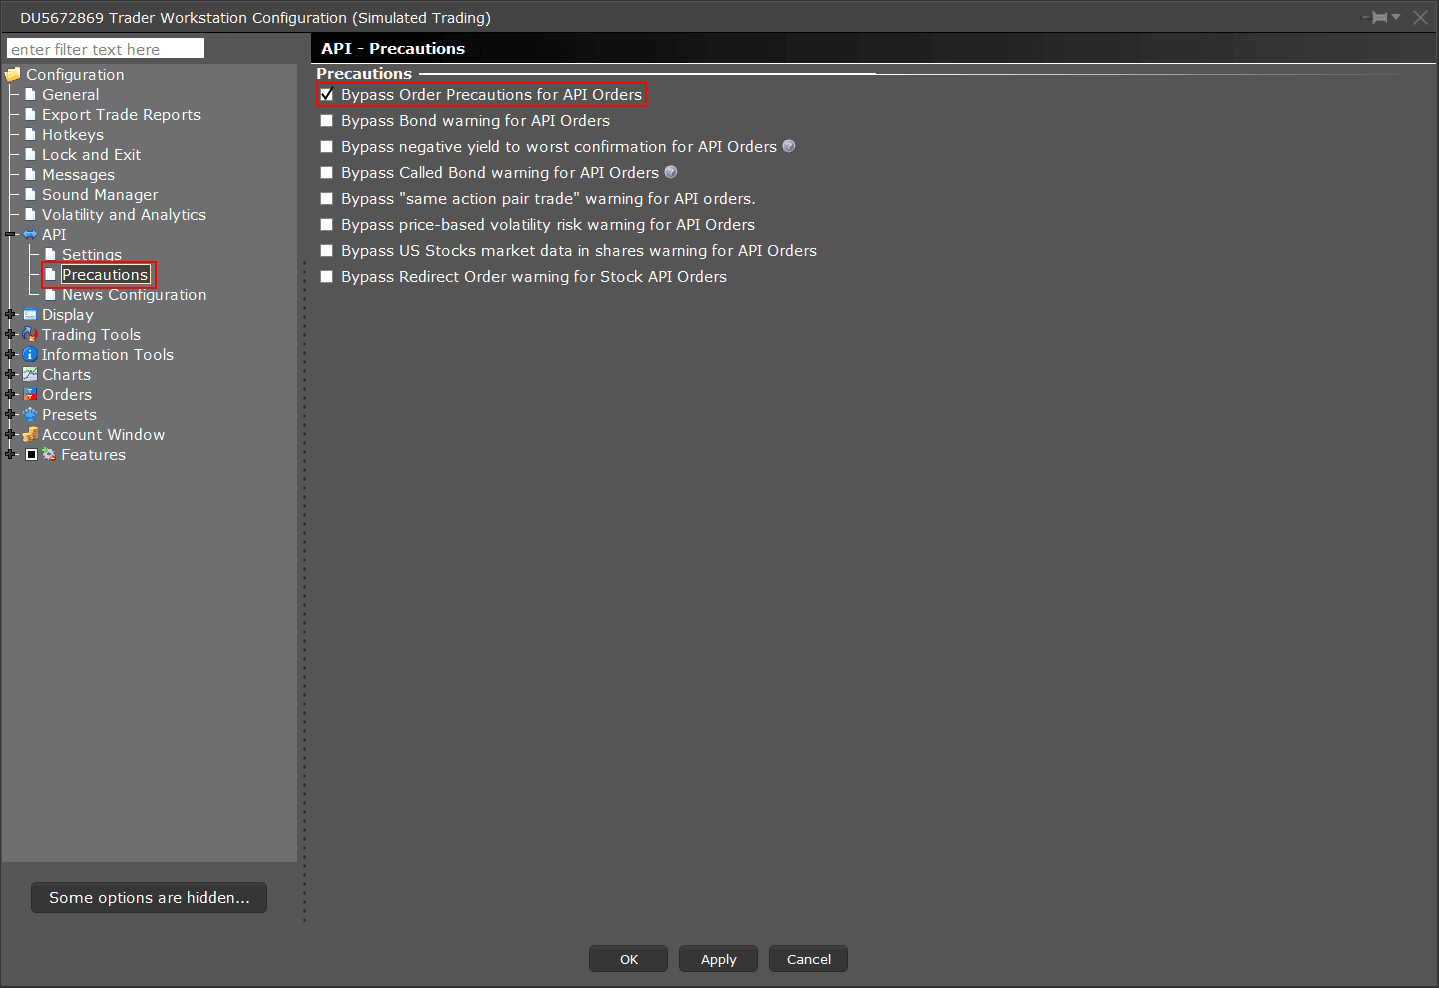
2.3. In the navigation bar, select API - Precautions. Make sure the option Bypass Order Precautions for API Orders is selected.
2.4. Click the OK button to save the changes.
3. Configuring a Binance account
The following steps are only necessary if you are going to use the CONNECTOR to synchronize with Binance.
3.1. Register an account at the Binance website or log in to your account if it was previously registered.
3.2. Go to your profile and make sure the two-factor authentication (2FA) is enabled.
3.3. Make sure you have completed the Identity Verification and your Verification Level is Verified Plus.
3.4. If you are going to use the USDⓈ-M Futures derivative and have not used it previously, go to the Binance Futures web-terminal and make sure that this instrument is activated.
3.5. Create an API Key.
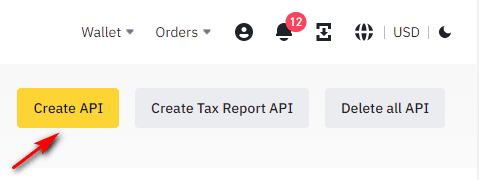
3.5.1. Go to the API management page and click the Create API button:
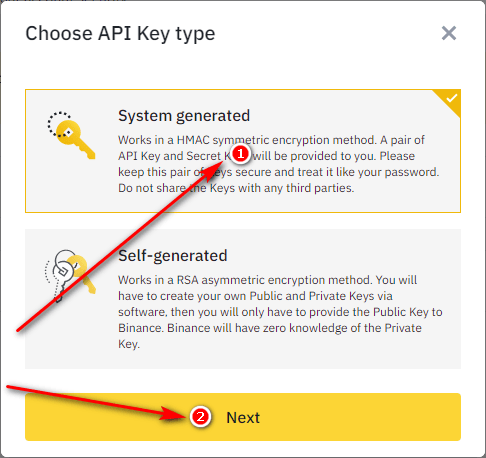
3.5.2. Select the System generated API Key type and click the Next button:
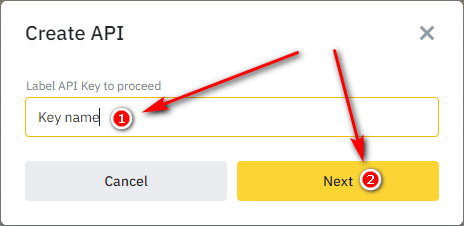
3.5.3. Enter an arbitrary API Key label and click the Next button:
3.5.4. Pass a security check including CAPTCHA and 2FA.
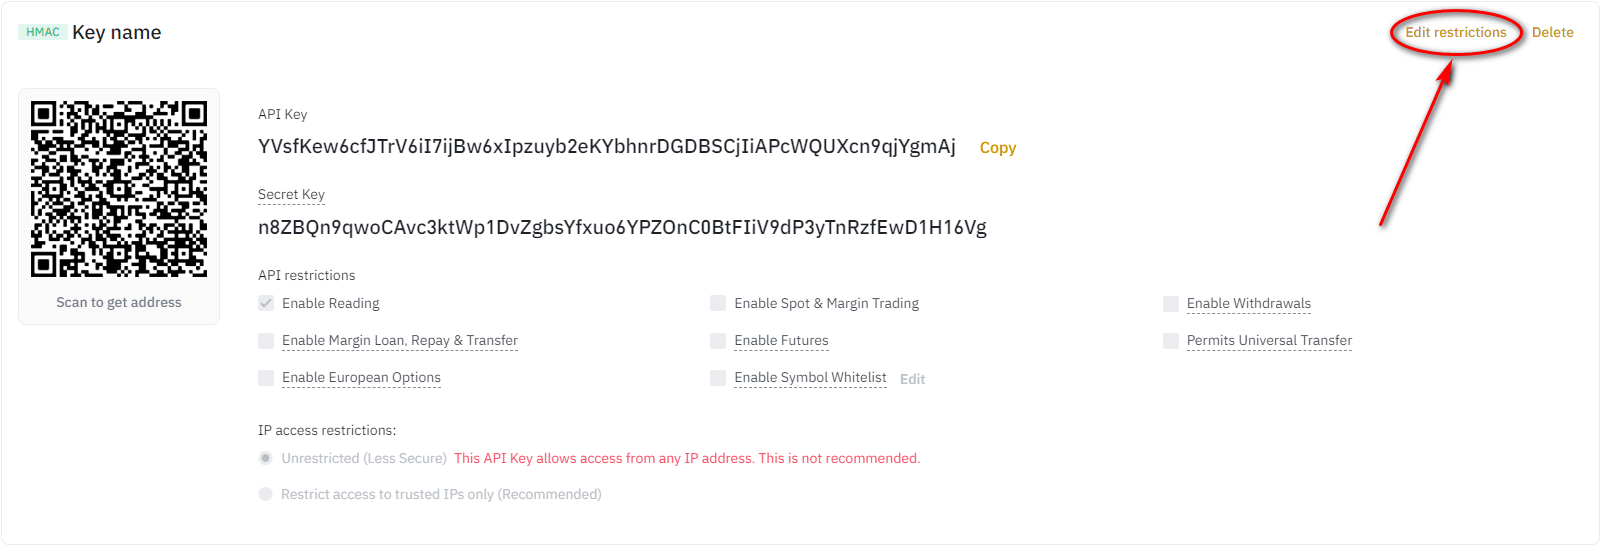
3.5.5. Click Edit restrictions
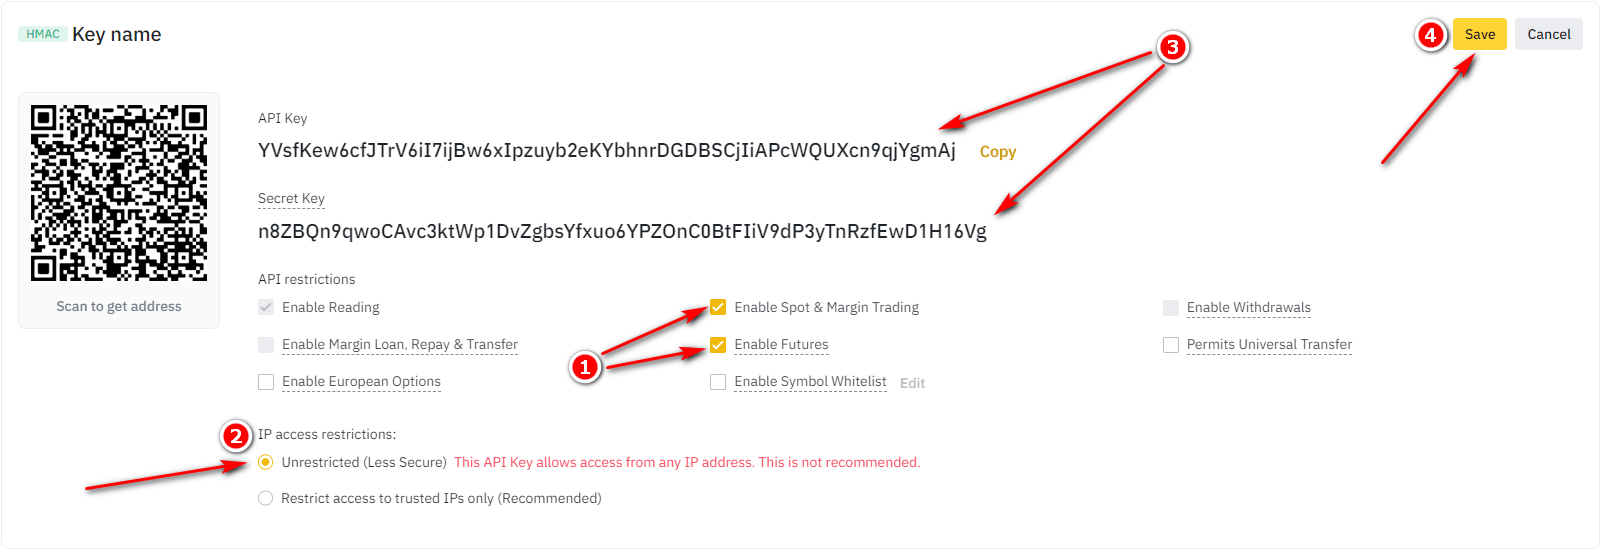
3.5.6. Make sure that the API functions you need are enabled: Futures and/or Spot trading. Select the Unrestricted IP access option to allow using the key from any IP address. Keep the API Key and the Secret Key in a safe place. Click the Save button.
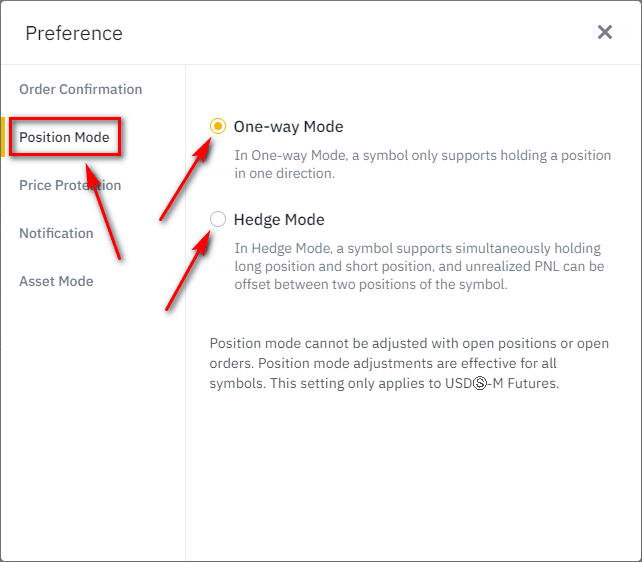
3.6. If you use Futures, the MT5 account type (netting, hedge) must match the Binance Position Mode (one-way, hedge), otherwise the CONNECTOR will not be launched.
To change the Binance Position Mode in the Binance Futures web-terminal:
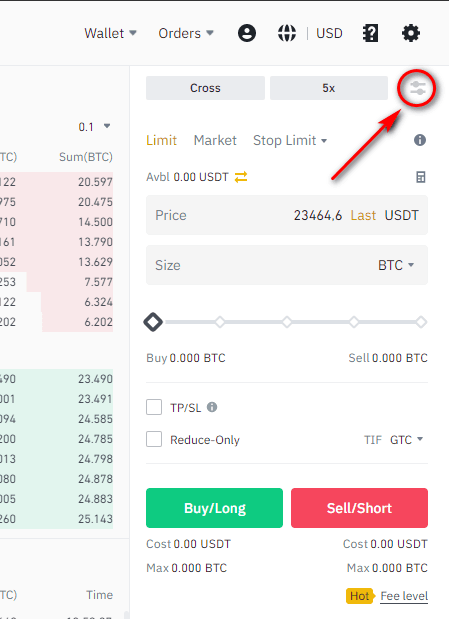
3.6.1. Click the settings icon in the upper right corner, and then click Preference in the menu that opens:
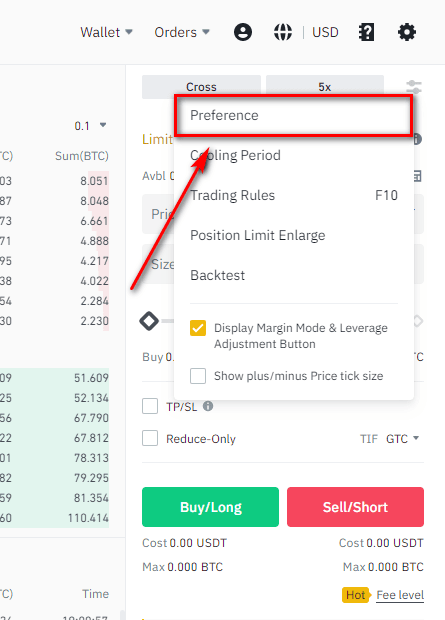
3.6.2. Select the Position Mode tab in the Preference window, and then select the required position mode:
4. Configuring a KuCoin account
The following steps are only necessary if you are going to use the CONNECTOR to synchronize with KuCoin.
4.1. Register an account at the KuCoin website or log in to your account if it was previously registered.
4.2. Go to the Account Security page and make sure that Google Verification and Trading Password are configured.
4.3. Create an API Key.
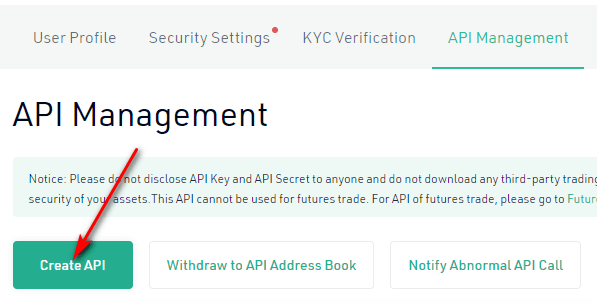
4.3.1. Go to the API Management page and click the Create API button:
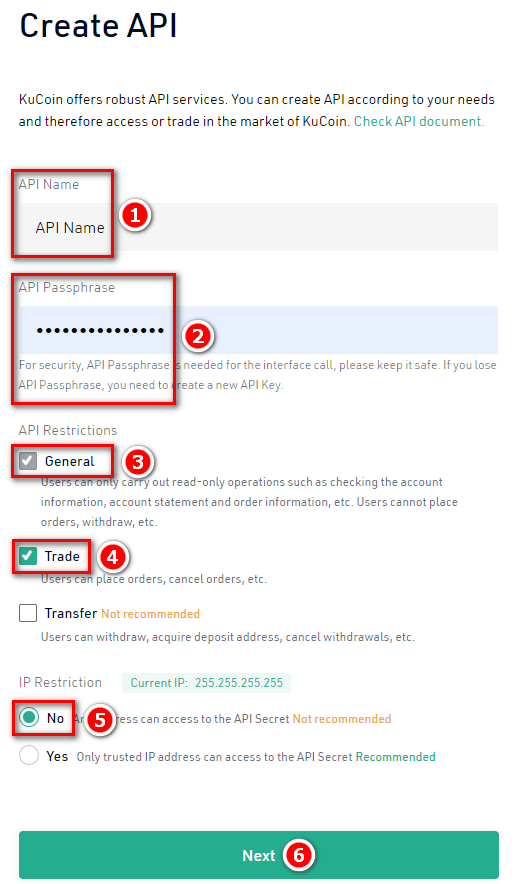
4.3.2. Enter an arbitrary API Name and an API Passphrase. Keep the API Passphrase in a safe place. Select the General and the Trade API Restrictions options. Select the No IP Restriction option to allow using the key from any IP address. Click Next.
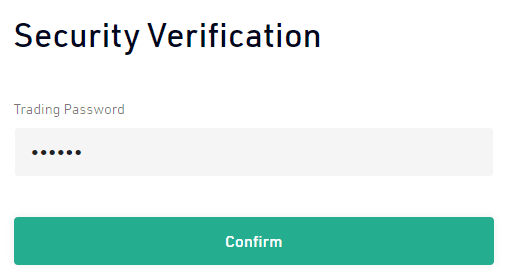
4.3.3. Enter your Trading Password and click Confirm:
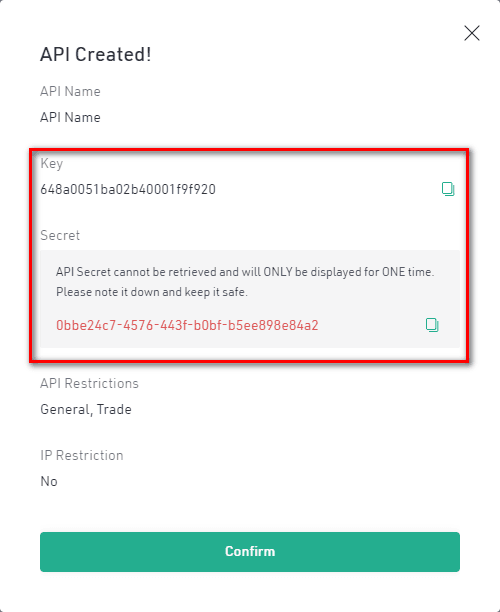
4.3.4. Keep the API Key and Secret in a safe place along with your API Passphrase.
5. Configuring a Kraken account
The following steps are only necessary if you are going to use the CONNECTOR to synchronize with Kraken.
5.1. Register an account at the Kraken website or log in to your account if it was previously registered.
5.2. Create a spot trading API Key (required if you are going to use the CONNECTOR to synchronize with Kraken spot).
5.2.1. Go to the trading API settings page and click the Create API key button in the Spot trading API section.

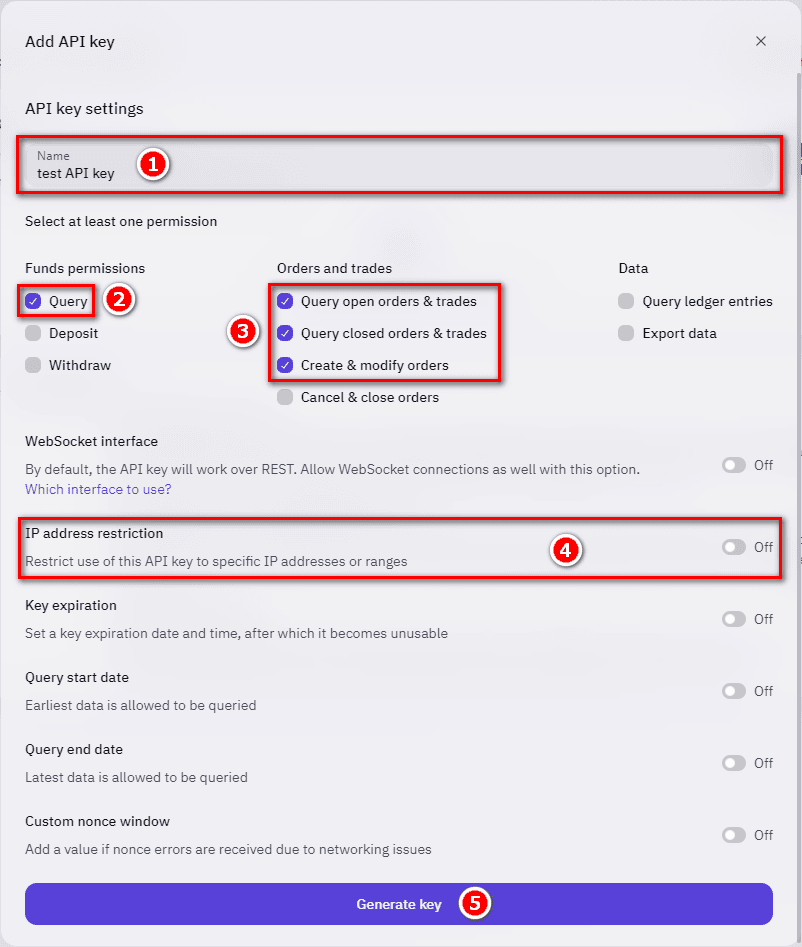
5.2.2. Enter an arbitrary Name. Select the Query funds permission. Select the options Query open orders & trades, Query closed orders & trades, Create & modify orders of the orders and trades permissions. Make sure the IP address restriction is disabled to allow using the key from any IP address. Click Generate key.
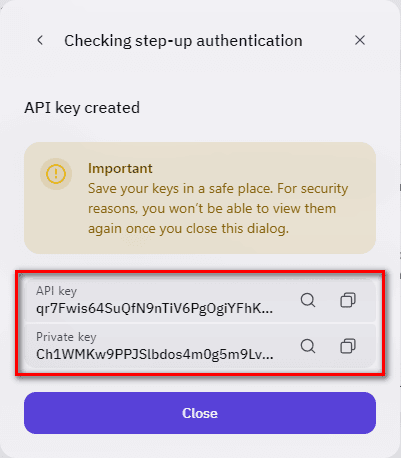
5.2.3. Keep the API key and the Private key in a safe place.
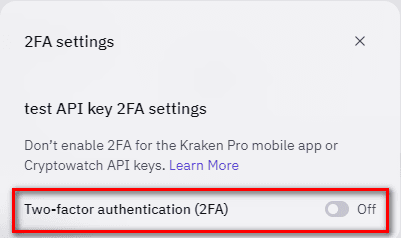
5.2.4. To enable 2FA for the spot trading API key, click the context menu button of the key and click the Add 2FA button of the context menu.

Enable the Two-factor authentication in the 2FA settings window.
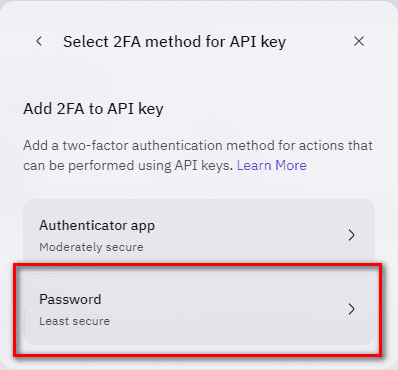
Select Password as 2FA method.
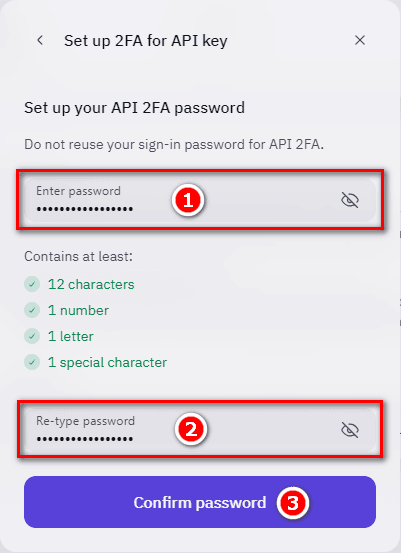
Enter and re-type the password. Keep the 2FA password in a safe place. Click Confirm password.
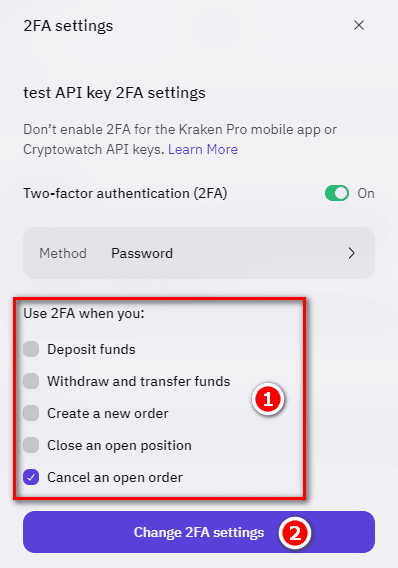
Choose when to use the 2FA and click Change 2FA settings.
5.3. Create a futures trading API Key (required if you are going to use the CONNECTOR to synchronize with Kraken futures).
5.3.1. Go to the trading API settings page and click the Create API key button in the Futures trading API section.

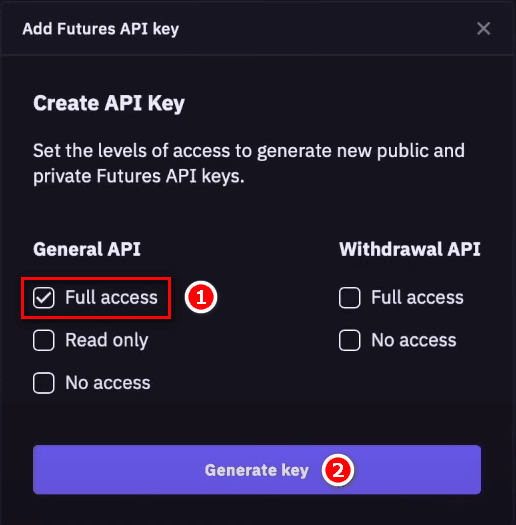
5.3.2. Make sure the Full access option is selected for the General API and click Generate key.
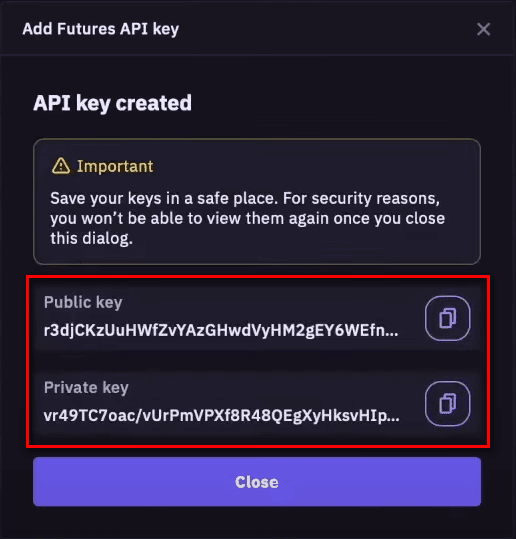
5.3.3. Keep the Public key and the Private key in a safe place.
6. Configuring a Bybit account
The following steps are only necessary if you are going to use the CONNECTOR to synchronize with Bybit.
6.1. Register an account at the Bybit website or log in to your account if it was previously registered.
6.2. Go to the Account & Security page and make sure that Google 2FA Authentication is configured.
6.3. Create an API Key.
6.3.1. Go to the API Management page and click the Create New key button.

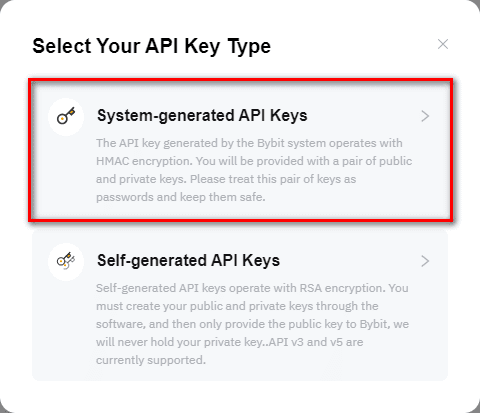
6.3.2. Select the System-generated API key type:
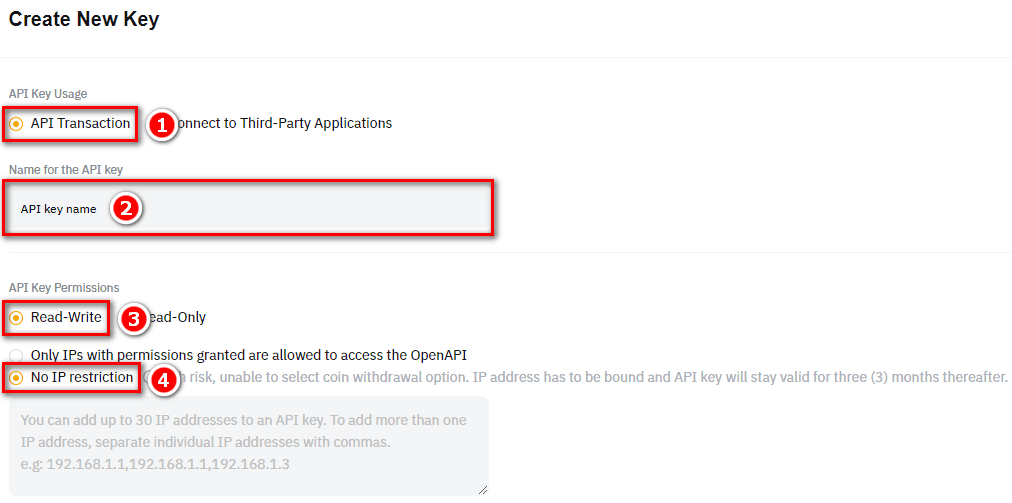
6.3.3. Select API Transaction from the API Key Usage options. Enter an arbitrary Name for the API key. Select Read-Write from the API Key Permissions options, and make sure the No IP Restriction option is selected if you want to use the key from any IP address.
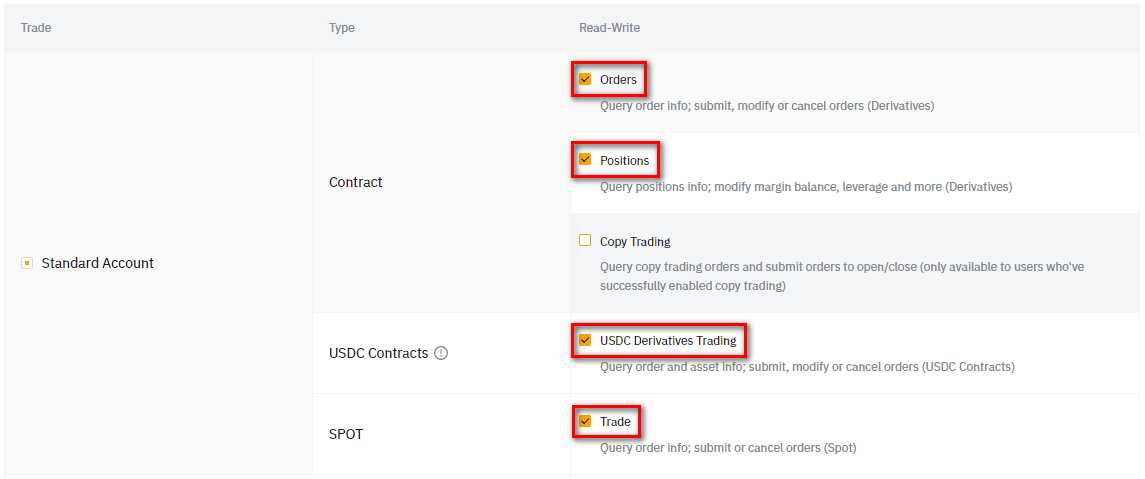
6.3.4. Select the following Standart Account options: Orders and Positions for Contract, USDC Derivatives Trading for USDC Contracts (if required) and Trade for SPOT.
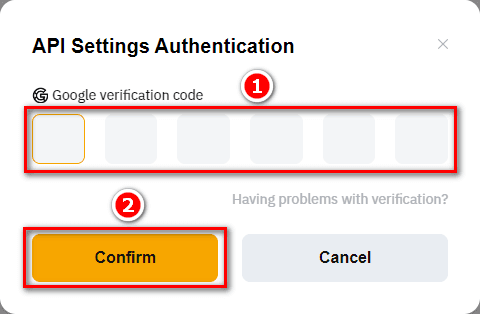
6.3.5. Click Submit. Enter Google verification code and click Confirm.
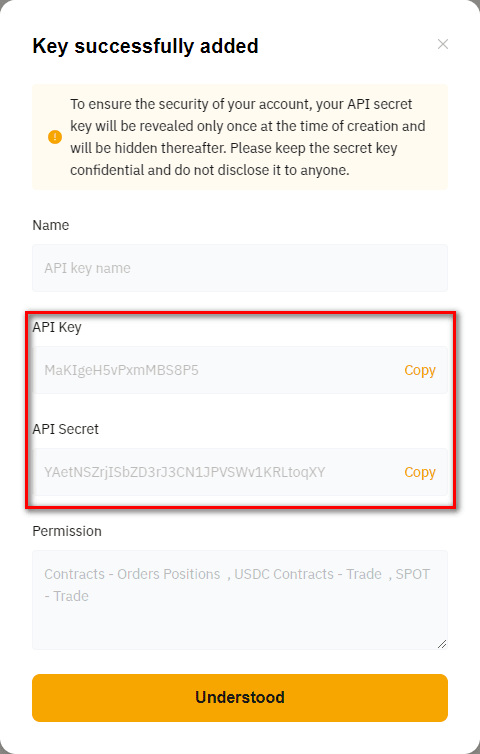
6.3.6. Keep the API Key and the API Secret in a safe place.
7. Configuring an OKX account
The following steps are only necessary if you are going to use the CONNECTOR to synchronize with OKX.
7.1. Register an account at the OKX website or log in to your account if it was previously registered.
7.2. Create an API Key.
7.2.1. Go to the API keys page and click the Create V5 API key button.

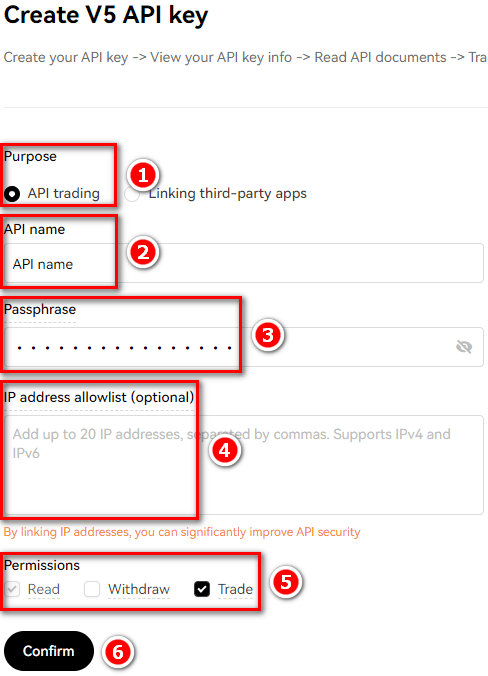
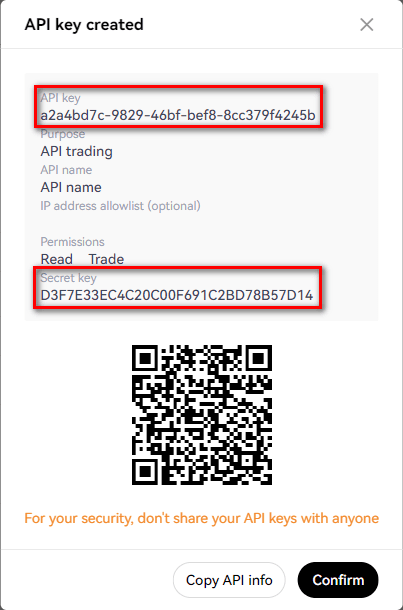
7.2.2. Select API trading purpose option. Enter an arbitrary API name, enter and remember Passphrase. Make sure the IP address allowlist is empty if you want to use the key from any IP address. Select Read and Trade permissions. Click Confirm.
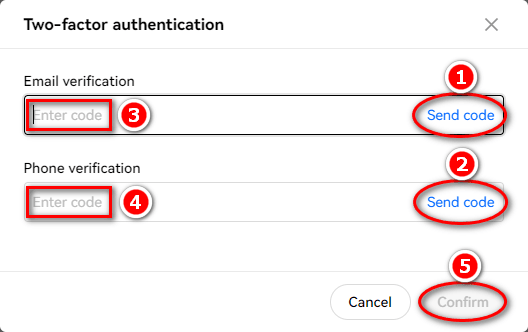
7.2.3. Click Send code in both Email verification and Phone verification fields of the Two-factor authentication window. When you receive the verification codes, enter them in the appropriate fields and click Confirm.
7.2.4. Keep the API Key and the Secret key in a safe place.
8. Launching the CONNECTOR
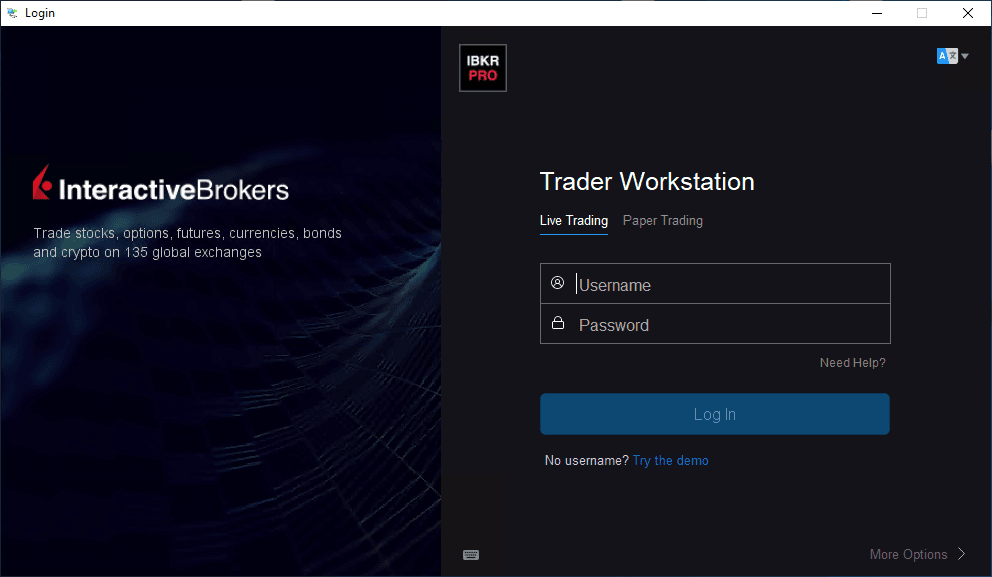
8.1. If you are going to use the CONNECTOR to synchronize with IB, launch the IB terminal (TWS), enter your username and password.
8.2. Launch the Connector Solutions / CSMultiConnector Expert Advisor.
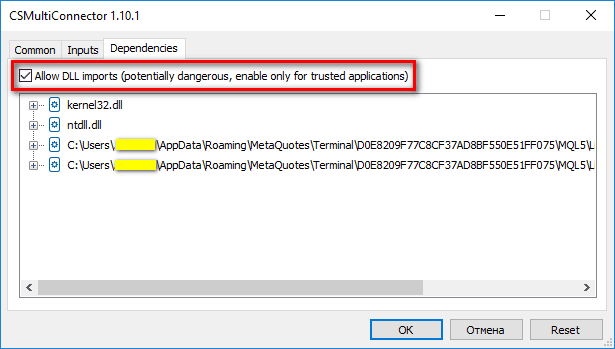
8.2.1. Make sure the Allow DLL imports option is selected on the Dependencies tab.
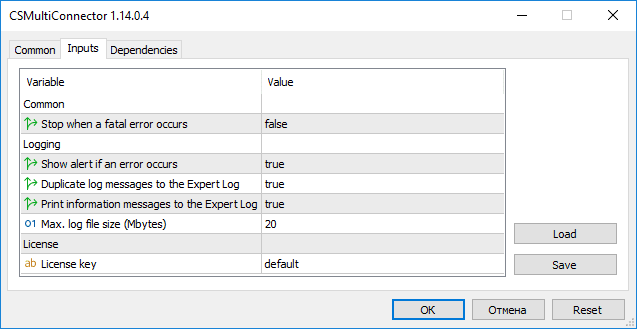
8.2.2. On the Inputs Parameters tab set the parameter values:
8.2.2.1. Common – general CONNECTOR settings:
8.2.2.1.1. Stop when a critical error occurs – the flag to terminate the CONNECTOR when a critical error occurs. Default value: false
8.2.2.2. Logging – logging options:
8.2.2.2.1. Show alert if an error occurs – the flag for displaying errors in the Alert window. If set to false, errors will be logged without displaying the Alert window. Default value: true
8.2.2.2.2. Duplicate log messages to the Expert Log – the flag for displaying log records on the Experts tab of the Toolbox panel. If set to false, the log entries will be written to a text log file only. Default value: true
8.2.2.2.3. Print information messages to the Expert Log – the flag for displaying informational log records on the Experts tab of the Toolbox panel. If the value is set to false, informational log records will be written to a text log file only, and warning and error log records will be displayed on the Experts tab in accordance with the value of the Duplicate log messages to the Expert Log parameter. Default value: true
8.2.2.2.4. Max. log file size (Mbytes) – the maximum size of the log file in megabytes. If the log size exceeds the value of this parameter, a new file will be created. Default value: 20
8.2.2.3. License – licensing parameters:
8.2.2.3.1. License key – your license key. If the value is not set or default, the trial version of the CONNECTOR will be launched, unless the trial period has expired. If you have previously registered a license key, insert it in this field. Default value: default
8.2.3. Click the OK button.
8.2.4. If a new CONNECTOR version is available, you will see a window prompting you to install the update. You can choose not to install the update and continue to use the current version.
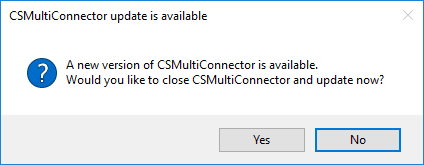
If installing the update is mandatory, then if you refuse to install the update or an error occurs when installing the update, the CONNECTOR will be closed.
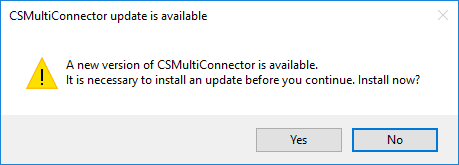
Upon receiving consent to install the update, the CONNECTOR will be closed and the installation dialog box will open. After the installation process is complete, you can start the CONNECTOR again.
Note. If such a message occurs during the installation of the update:
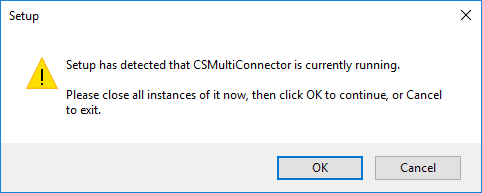
- then you should check whether an instance of the Connector Solutions/CSMultiConnector Expert Advisor is running in the MT5 terminal, and if it is running, then stop it and click OK in the installer window. If this message appears again, then restart the MT5 terminal and click OK again in the installer window.
8.2.5. If the current version of the CONNECTOR is up to date, a window prompting you to choose a connector will open.
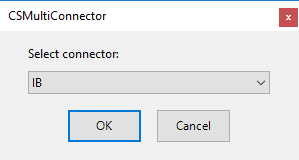
The list of connectors will contain only those connectors that are activated for your licensed or trial version. If only one connector is activated, this window will be skipped.
8.2.6. After selecting the connector, the license key will be checked.
8.2.6.1. If you are running the trial version (License - License key input parameter value is empty string or default) and it is not expired, you will see a window with a message indicating the time remaining before the trial period expires and an offer to purchase a license:
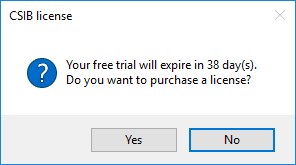
You may click No and continue using the trial version.
8.2.6.2. If the trial period has expired, a window will appear with the corresponding message:
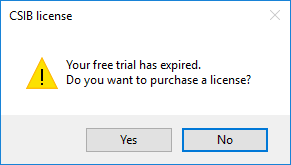
In this case, if you click No, the CONNECTOR will terminate its operation.
8.2.6.3. If you agree to purchase a license, a window will appear asking you to enter your email address:
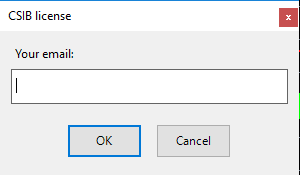
Enter your email and click OK. After a successful license key registration, a window with your new license key will open:

Keep the key in a safe place and use it at the next CONNECTOR launches as the License - License key input parameter. The CONNECTOR will continue to operate after the window is closed.
8.2.6.4. If the value of the License - License key input parameter is a valid license key, the full version of the CONNECTOR will be launched. If there are less than 7 days left before the license expires, a message with a proposal to renew the validity of the license key will appear. You may click No and proceed.
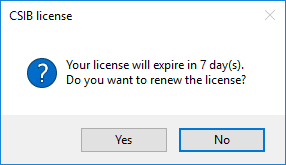
8.2.6.5. If the license has expired, a warning with a proposal to renew the validity of the license key will appear:
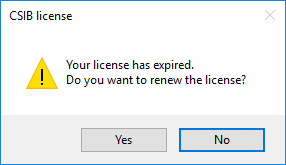
In this case, if you click No, the CONNECTOR will terminate its operation.
8.2.6.6. Click Yes to renew the license. In case of successful renewal of the license key validity period, a message will be displayed indicating the period for which the key validity period was renewed:
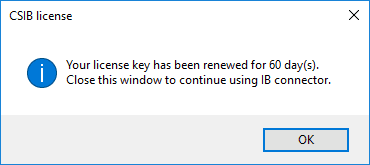
The CONNECTOR will continue its operation as soon as the window is closed.
8.2.7. If the license check succeeded, a settings window for a selected connector will open:
8.2.7.1. IB settings window:
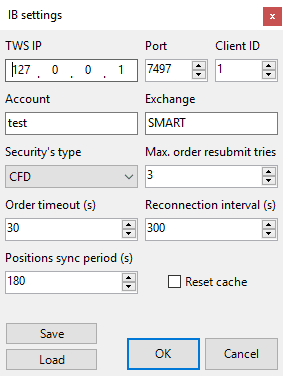
8.2.7.1.1. TWS IP – the IP address at which TWS is available for connection.
Default value: 127.0.0.1
8.2.7.1.2. Port – the socket port assigned in the TWS settings.
Default value: 7497
8.2.7.1.3. Client ID – the client ID must be unique if more than one client is connected to TWS.
Default value: 1
8.2.7.1.4. Account – the IB account trades will be allocated to.
Default value: empty string
8.2.7.1.5. Exchange - the target exchange of the contract.
Default value: SMART
8.2.7.1.6. Security’s type – the type of securities of the contract. Currently, only CFD and CASH contracts are supported.
Default value: CFD
8.2.7.1.7. Max. order resubmit tries – the maximum number of attempts to place an order in IB in case of an error on the IB server side.
Default value: 3
8.2.7.1.8. Order timeout (s) – the maximum waiting time for the full execution of the order in seconds.
Default value: 30
8.2.7.1.9. Reconnection interval (s) – the time interval in seconds between repeated connection attempts in case of connection loss.
Default value: 300
8.2.7.1.10. Position sync period (s) – the periodicity of positions synchronization in seconds. Set to 0 to disable periodic positions synchronization.
Default value: 180
8.2.7.1.11. Reset cache – the flag for resetting the saved mappings between the symbols of the original trades and IB contracts. This may be necessary in case of a change in the symbol name by the broker or a change in the IB contract.
Default value: not selected
8.2.7.2. Binance settings window:
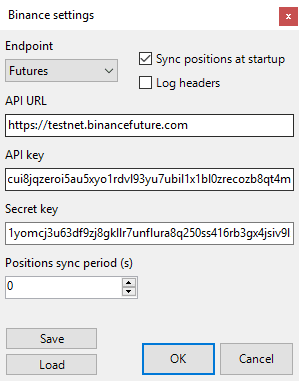
8.2.7.2.1. Endpoint – the Binance API endpoint type: Spot or Futures.
Default value: Spot
8.2.7.2.2. Sync positions at startup – the flag to synchronize positions between MT5 and Binance at startup.
Default value: not selected
8.2.7.2.3. Log headers – the flag to enable logging HTTP headers during the data exchange between MT5 and Binance.
Default value: not selected
8.2.7.2.4. API URL – the Binance API endpoint URL.
Default value: empty string
8.2.7.2.5. API key – previously registered Binance API key.
Default value: empty string
8.2.7.2.6. Secret key – a secret key associated with the API key.
Default value: empty string
8.2.7.2.7. Position sync period (s) – the periodicity of positions synchronization in seconds. Set to 0 to disable periodic positions synchronization.
Default value: 180
8.2.7.3. KuCoin settings window:
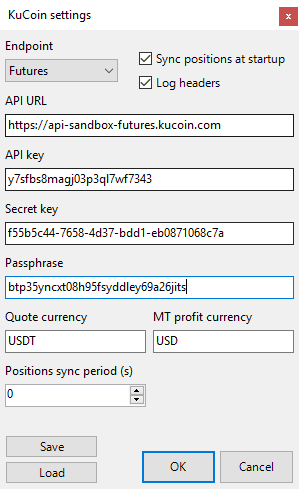
8.2.7.3.1. Endpoint – the KuCoin API endpoint type: Spot or Futures.
Default value: Spot
8.2.7.3.2. Sync positions at startup – the flag to synchronize positions between MT5 and KuCoin at startup.
Default value: not selected
8.2.7.3.3. Log headers – the flag to enable logging HTTP headers during the data exchange between MT5 and KuCoin.
Default value: not selected
8.2.7.3.4. API URL – the KuCoin API endpoint URL.
Default value: empty string
8.2.7.3.5. API key – previously registered KuCoin API key.
Default value: empty string
8.2.7.3.6. Secret key – a secret key associated with the API key.
Default value: empty string
8.2.7.3.7. Passphrase – a passphrase associated with the API key.
Default value: empty string
8.2.7.3.8. Quote currency – KuCoin symbol quote currency.
Default value: empty string
8.2.7.3.9. MT profit currency – MT5 symbol profit currency.
Default value: empty string
8.2.7.3.10. Position sync period (s) – the periodicity of positions synchronization in seconds. Set to 0 to disable periodic positions synchronization.
Default value: 180
8.2.7.4. Kraken settings window:
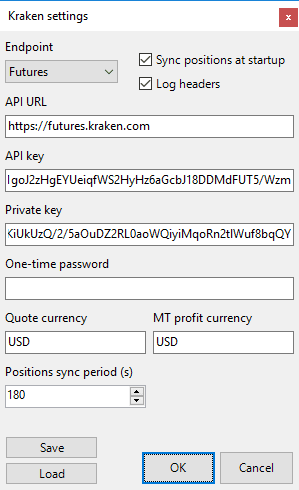
8.2.7.4.1. Endpoint – the Kraken API endpoint type: Spot or Futures.
Default value: Spot
8.2.7.4.2. Sync positions at startup – the flag to synchronize positions between MT5 and Kraken at startup.
Default value: not selected
8.2.7.4.3. Log headers – the flag to enable logging HTTP headers during the data exchange between MT5 and Kraken.
Default value: not selected
8.2.7.4.4. API URL – the Kraken API endpoint URL.
Default value: empty string
8.2.7.4.5. API key – previously registered Kraken API key.
Default value: empty string
8.2.7.4.6. Private key – a private key associated with the API key.
Default value: empty string
8.2.7.4.7. One-time password – a one-time password for 2FA (mandatory if 2FA is enabled for the API key).
Default value: empty string
8.2.7.4.8. Quote currency – Kraken symbol quote currency.
Default value: empty string
8.2.7.4.9. MT profit currency – MT5 symbol profit currency.
Default value: empty string
8.2.7.4.10. Position sync period (s) – the periodicity of positions synchronization in seconds. Set to 0 to disable periodic positions synchronization.
Default value: 180
8.2.7.5. Bybit settings window:
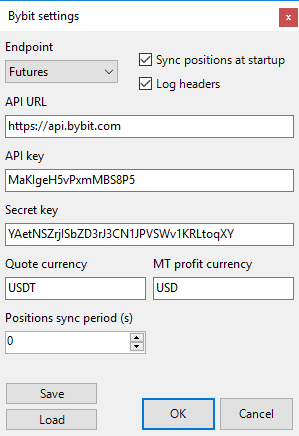
8.2.7.5.1. Endpoint – the Bybit API endpoint type: Spot or Futures.
Default value: Spot
8.2.7.5.2. Sync positions at startup – the flag to synchronize positions between MT5 and Bybit at startup.
Default value: not selected
8.2.7.5.3. Log headers – the flag to enable logging HTTP headers during the data exchange between MT5 and Bybit.
Default value: not selected
8.2.7.5.4. API URL – the Bybit API endpoint URL.
Default value: empty string
8.2.7.5.5. API key – previously registered Bybit API key.
Default value: empty string
8.2.7.5.6. Secret key – a secret key associated with the API key.
Default value: empty string
8.2.7.5.7. Quote currency – Bybit symbol quote currency.
Default value: empty string
8.2.7.5.8. MT profit currency – MT5 symbol profit currency.
Default value: empty string
8.2.7.5.9. Position sync period (s) – the periodicity of positions synchronization in seconds. Set to 0 to disable periodic positions synchronization.
Default value: 180
8.2.7.6. OKX settings window:
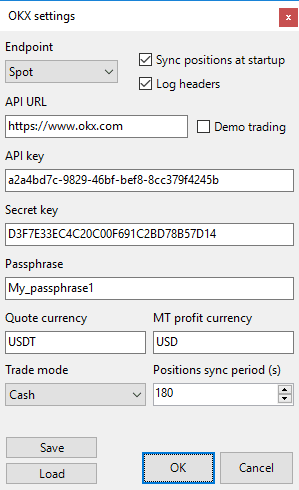
8.2.7.6.1. Endpoint – the OKX API endpoint type: Spot or Futures.
Default value: Spot
8.2.7.6.2. Sync positions at startup – the flag to synchronize positions between MT5 and OKX at startup.
Default value: not selected
8.2.7.6.3. Log headers – the flag to enable logging HTTP headers during the data exchange between MT5 and OKX.
Default value: not selected
8.2.7.6.4. API URL – the OKX API endpoint URL.
Default value: https://www.okx.com
8.2.7.6.5. Demo trading – the flag to enable OKX demo trading.
Default value: not selected
8.2.7.6.6. API key – previously registered OKX API key.
Default value: empty string
8.2.7.6.7. Secret key – a secret key associated with the API key.
Default value: empty string
8.2.7.6.8. Passphrase – a passphrase associated with the API key.
Default value: empty string
8.2.7.6.9. Quote currency – OKX symbol quote currency.
Default value: empty string
8.2.7.6.10. MT profit currency – MT5 symbol profit currency.
Default value: empty string
8.2.7.6.11. Trade mode – the OKX account trade mode: Cash for spot, Isolated margin or Cross-margin for futures.
Default value: Cash for spot and Isolated margin for futures
8.2.7.6.12. Position sync period (s) – the periodicity of positions synchronization in seconds. Set to 0 to disable periodic positions synchronization.
Default value: 180
8.2.8. Click OK in a settings window. Wait while the selected connector is initialized. If the initialization was successful, the green Pause button will appear and the Running message will appear under the lines with version and license information.

8.2.9. To pause the CONNECTOR click the Pause button. If the red Resume button is visible and the Paused message is shown under the lines with version and license information, positions will not be synchronized until the Resume button is clicked.

9. CONNECTOR for IB features
9.1. Positions will be synchronized between MT5 and IB at the CONNECTOR startup by submitting orders to IB, bringing Binance positions in line with MT5 positions. For example, your MT5 positions are: 0 EURUSD, 1000 JPYUSD, and your IB positions are: 2000 EURUSD, 0 JPYUSD. During the synchronization, two market orders will be executed from your IB account: sell 2000 EURUSD and buy 1000 JPYUSD.
9.2. An attempt to synchronize positions between MT5 and IB will be performed in the same way after clicking the Resume button, if the CONNECTOR was paused by clicking the Pause button or due to an error during the last synchronization of positions.
9.3. If the Position sync period (s) setting value is greater than 0, positions will be synchronized periodically. The frequency of synchronizations is defined by the setting value. Periodic synchronization will not be performed if the CONNECTOR is paused.
9.4. Only netting accounts are supported, since IB accounts allow only one position on a selected instrument in any direction.
9.5. It is possible to work with only one type of the IB contract securities (Security's type setting) at a time. If you need to switch to another type of securities, you must stop the CONNECTOR, close all positions in MT5 and IB, and then start the CONNECTOR again. Otherwise, during synchronization, all positions opened in the MT5 terminal will be duplicated in IB with the selected type of the IB contract securities, and IB positions that do not have a match in the MT5 terminal will be closed.
10. CONNECTOR for Binance features
10.1. If the Sync positions at startup option is selected, positions will be synchronized between MT5 and Binance at the CONNECTOR startup by submitting orders to Binance, bringing Binance positions in line with MT5 positions. For example, the Endpoint setting value is Futures, your MT5 positions are: 0 BTCUSD, 0.1 ETHUSD, and your Binance futures positions are: 0.01 BTCUSDT, 0 ETHUSDT. During the synchronization, two market orders will be executed from your Binance account: sell 0.01 BTCUSDT and buy 0.1 ETHUSDT.
10.2. An attempt to synchronize positions between MT5 and Binance will be performed in the same way after clicking the Resume button, if the CONNECTOR was paused by clicking the Pause button or due to an error during the last synchronization of positions.
10.3. If the Position sync period (s) setting value is greater than 0, positions will be synchronized periodically. The frequency of synchronizations is defined by the setting value. Periodic synchronization will not be performed if the CONNECTOR is paused.
10.4. If the Endpoint setting value is Spot, make sure that your trading account has only USDT and the currencies that you are going to trade.
11. CONNECTOR for KuCoin, Kraken, Bybit and OKX features
11.1. If the Sync positions at startup option is selected, positions will be synchronized between MT5 and a target platform at the CONNECTOR startup by submitting orders to a target platform, bringing positions at a target platform in line with MT5 positions. For example, the Endpoint setting value is Spot, the Quote currency setting value is USDT, the MT profit currency setting value is USD, your MT5 positions are: 0 BTC, 0.1 ETH, and your trading account balance at a target platform is: 0.01 BTC, 0 ETH, 100000 USDT. During the synchronization, two market orders will be executed from your trading account at a target platform: sell 0.01 BTC and buy 0.1 ETH.
11.2. An attempt to synchronize positions between MT5 and a target platform will be performed in the same way after clicking the Resume button, if the CONNECTOR was paused by clicking the Pause button or due to an error during the last synchronization of positions.
11.3. If the Position sync period (s) setting value is greater than 0, positions will be synchronized periodically. The frequency of synchronizations is defined by the setting value. Periodic synchronization will not be performed if the CONNECTOR is paused.
11.4. If the Endpoint setting value is Spot, make sure that your trading account has only the currencies that you are going to trade and the currency specified in the Quote currency setting.
12. How to install the CONNECTOR on Linux
12.1. Install Wine and MetaTrader 5 if not already installed.
12.1.1. Create a shell script file and make it executable using the command line:
    nano wineAndMt5Install.sh
    chmod +x wineAndMt5Install.sh
12.1.2. Paste a script for your system to the file and save it. Change MT5_INSTALLER_URL (and the file name on the last line of the script accordingly) if you need to install MetaTrader 5 terminal from a different source. You may also change MT5_WINE_PREFIX and WINE_VERSION if necessary.
12.1.2.1. Ubuntu:
    #!/bin/bash
# MetaTrader 5 download URL
MT5_INSTALLER_URL="https://download.mql5.com/cdn/web/metaquotes.software.corp/mt5/mt5setup.exe"
# Wine prefix where MetaTrader 5 will be installed
MT5_WINE_PREFIX=~/.mt5
# Wine version to install: stable or devel
WINE_VERSION="stable"
# Prepare: switch to 32 bit and add Wine key
sudo dpkg --add-architecture i386
wget -nc https://dl.winehq.org/wine-builds/winehq.key
sudo mkdir /etc/apt/keyrings
sudo mv winehq.key /etc/apt/keyrings/winehq-archive.key
# Get Ubuntu version and trim to major only
OS_VER=$(lsb_release -r |cut -f2 |cut -d "." -f1)
# Choose repository based on Ubuntu version
if (( $OS_VER >= 22)); then
 wget -nc https://dl.winehq.org/wine-builds/ubuntu/dists/jammy/winehq-jammy.sources
 sudo mv winehq-jammy.sources /etc/apt/sources.list.d/
elif (( $OS_VER < 22 )) && (( $OS_VER >= 21 )); then
 wget -nc https://dl.winehq.org/wine-builds/ubuntu/dists/impish/winehq-impish.sources
 sudo mv winehq-impish.sources /etc/apt/sources.list.d/
elif (( $OS_VER < 21 )) && (( $OS_VER >=20 )); then
 wget -nc https://dl.winehq.org/wine-builds/ubuntu/dists/focal/winehq-focal.sources
 sudo mv winehq-focal.sources /etc/apt/sources.list.d/
elif (( $OS_VER < 20 )); then
 wget -nc https://dl.winehq.org/wine-builds/ubuntu/dists/bionic/winehq-bionic.sources
 sudo mv winehq-bionic.sources /etc/apt/sources.list.d/
fi
# Update package and install Wine
sudo apt update
sudo apt upgrade
sudo apt install --install-recommends winehq-$WINE_VERSION
# Download MetaTrader 5
wget $MT5_INSTALLER_URL
# Set environment to Windows 10
WINEPREFIX=$MT5_WINE_PREFIX winecfg -v=win10
# Start MetaTrader 5 installer
WINEPREFIX=$MT5_WINE_PREFIX wine mt5setup.exe
12.1.2.2. Debian:
    #!/bin/bash
# MetaTrader 5 download URL
MT5_INSTALLER_URL="https://download.mql5.com/cdn/web/metaquotes.software.corp/mt5/mt5setup.exe"
# Wine prefix where MetaTrader 5 will be installed
MT5_WINE_PREFIX=~/.mt5
# Wine version to install: stable or devel
WINE_VERSION="stable"
# Prepare: switch to 32 bit and add Wine key
sudo dpkg --add-architecture i386
wget -nc https://dl.winehq.org/wine-builds/winehq.key
sudo mkdir /etc/apt/keyrings
sudo mv winehq.key /etc/apt/keyrings/winehq-archive.key
# Get Debian version and trim to major only
OS_VER=$(lsb_release -r |cut -f2 |cut -d "." -f1)
# Choose repository based on Debian version
if (( $OS_VER >= 12)); then
 wget -nc https://dl.winehq.org/wine-builds/debian/dists/bookworm/winehqbookworm.sources
 sudo mv winehq-bookworm.sources /etc/apt/sources.list.d/
elif (( $OS_VER < 12 )) && (( $OS_VER >= 11 )); then
 wget -nc https://dl.winehq.org/wine-builds/debian/dists/bullseye/winehqbullseye.sources
 sudo mv winehq-bullseye.sources /etc/apt/sources.list.d/
elif (( $OS_VER <= 10 )); then
 wget -nc https://dl.winehq.org/wine-builds/debian/dists/buster/winehq-buster.sources
 sudo mv winehq-buster.sources /etc/apt/sources.list.d/
fi
# Update package and install Wine
sudo apt update
sudo apt upgrade
sudo apt install --install-recommends winehq-$WINE_VERSION
# Download MetaTrader 5
wget $MT5_INSTALLER_URL
# Set environment to Windows 10
WINEPREFIX=$MT5_WINE_PREFIX winecfg -v=win10
# Start MetaTrader 5 installer
WINEPREFIX=$MT5_WINE_PREFIX wine mt5setup.exe
12.1.3. Run the script.
12.2. Check if Winetricks is installed:
dpkg -s winetricks
If not, follow the installation procedure.
12.3. Check if .NET Framework 4.8 is installed. Run command (replace [wine prefix path] with the path to the Wine prefix where you want to install the CONNECTOR):
WINEPREFIX=[wine prefix path] winetricks list-installed
If the output does not contain dotnet48 line, run .NET Framework 4.8 automatic installation through winetricks (replace [wine prefix path] with the path to the Wine prefix where you want to install the CONNECTOR):
WINEPREFIX=[wine prefix path] winetricks dotnet48
12.4. Download and start the CONNECTOR installer (replace [wine prefix path] with the path to the Wine prefix where you want to install the CONNECTOR):
    wget "https://connector.solutions/Themes/Orchard.ConnectorSolutions/content/download/CSMultiConnector_Setup.exe"
    WINEPREFIX=[wine prefix path] wine CSMultiConnector_Setup.exe
13. How to install the CONNECTOR on Mac OS
13.1. Download and install XQuartz if not installed.
13.2. Download and install PlayOnMac if not installed and run it.
13.3. Install Wine version 7.10 or later if not installed.
13.3.1. Click Tools - Manage Wine versions in the PlayOnMac menu bar.

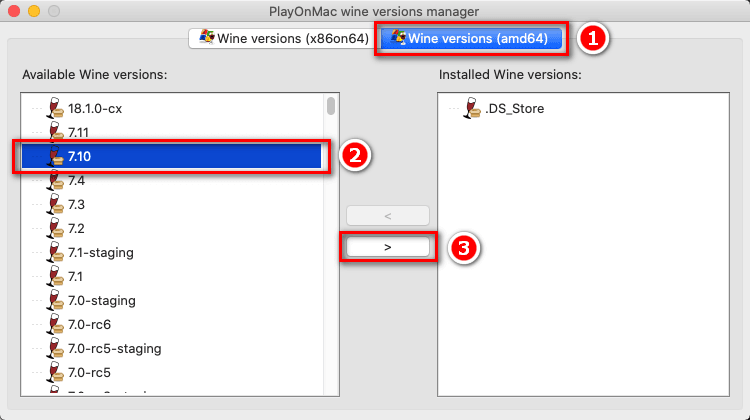
13.3.2. Select Wine versions (amd64) in the PlayOnMac wine versions manager window. Select 7.10 or later Wine version and click > to start installation wizard.
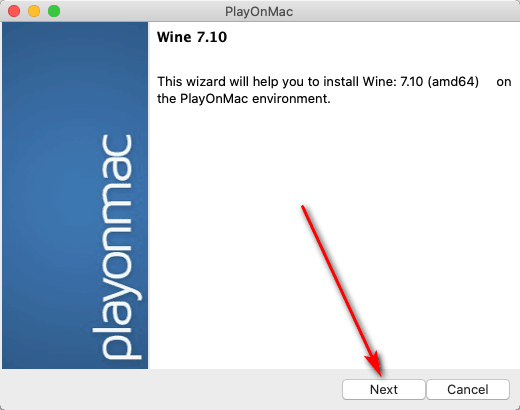
13.3.3. Click Next in the wizard window.
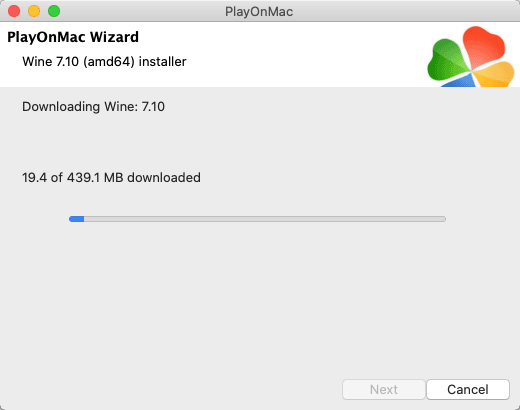
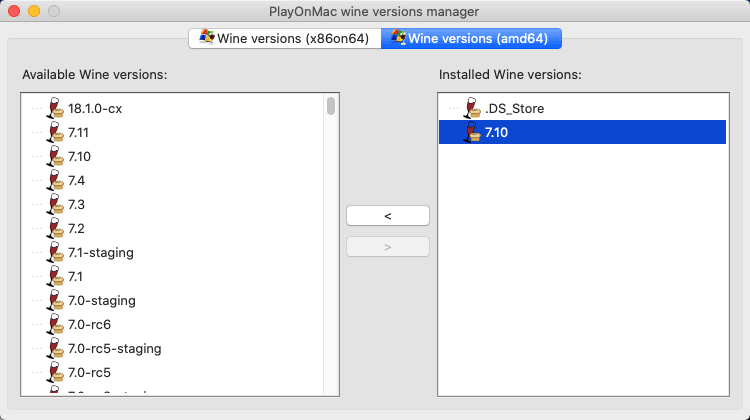
13.3.4. Wait for the installation to complete.
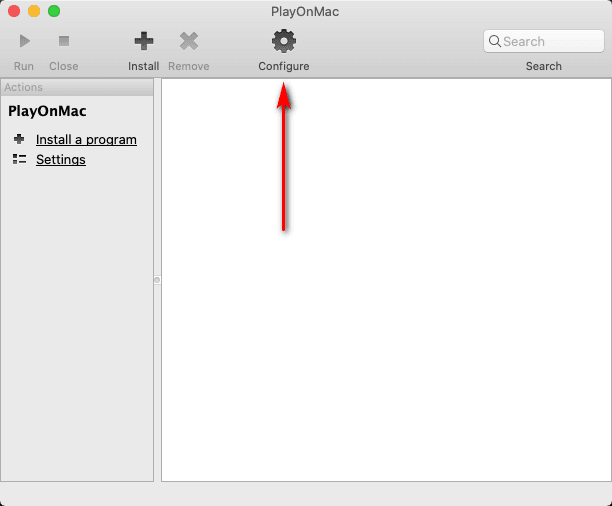
13.4. Click Configure in the PlayOnMac window.
13.5. Select existing 64 bits virtual drive (Wine prefix) or create a new one.
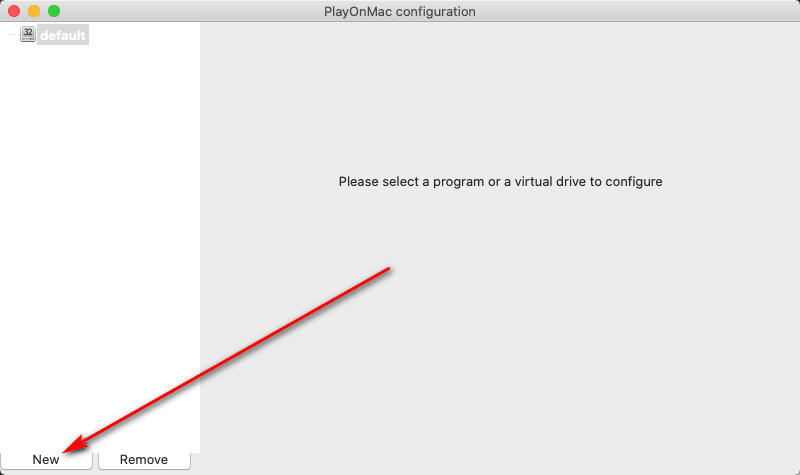
13.5.1. Click New in the PlayOnMac configuration window to create a new virtual drive.
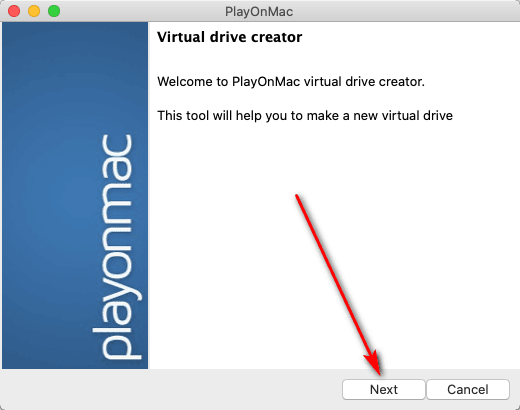
13.5.2. Click Next in the Virtual drive creator wizard window.
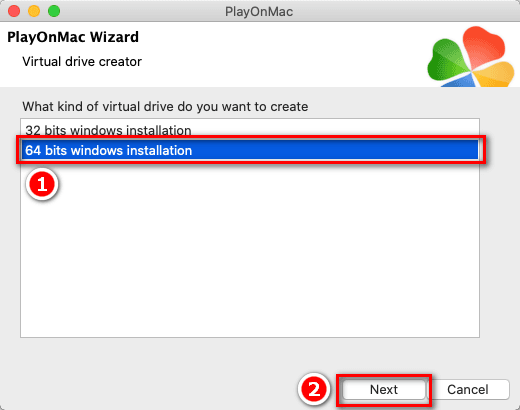
13.5.3. Select 64 bits windows installation option and click Next.
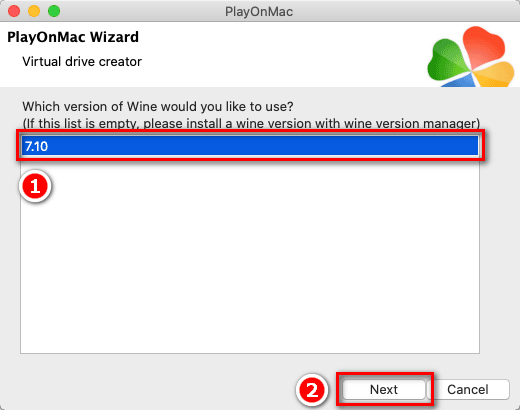
13.5.4. Select Wine version 7.10 or later and click Next.
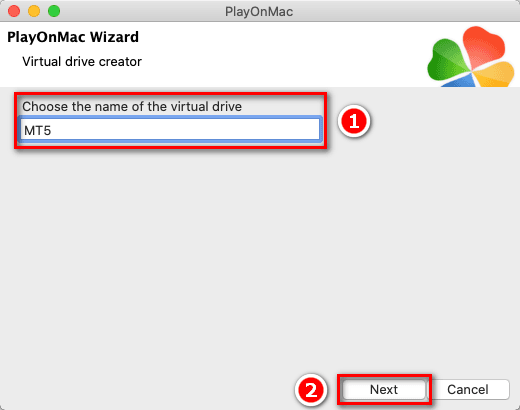
13.5.5. Enter the name of the virtual drive, click Next and wait for the installation to complete.
13.6. Install .NET Framework 4.8 to your Wine virtual drive if not installed.
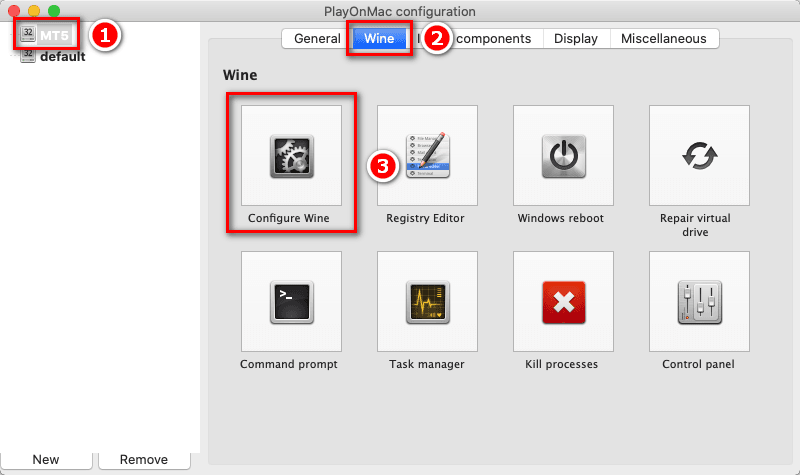
13.6.1. Change Wine reported version to Windows XP. Select Wine virtual drive, select Wine tab on right pane and click Configure Wine.
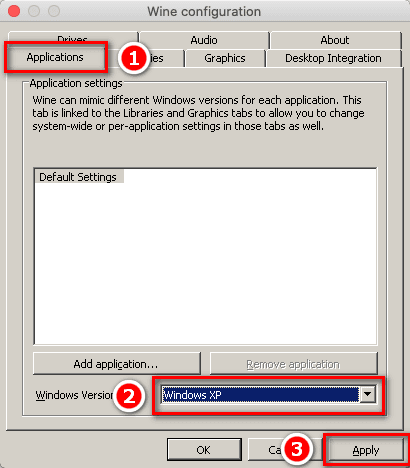
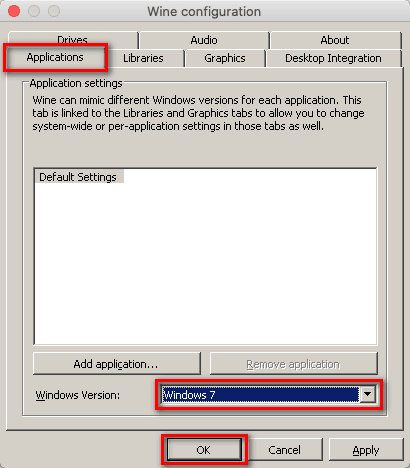
13.6.2. Select Applications tab in the Wine configuration window. Select Windows XP version and click Apply.
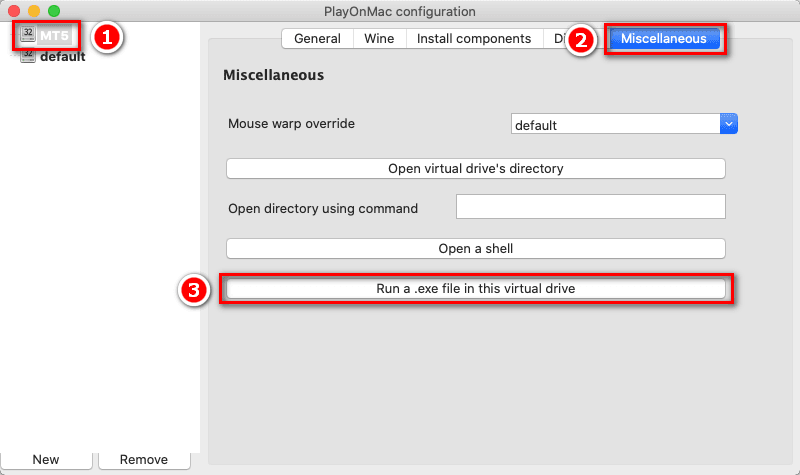
13.6.3. Download .NET Framework 4.0 installer. Select Miscellaneous tab in the PlayOnMac configuration window and click Run a .exe file in this virtual drive.
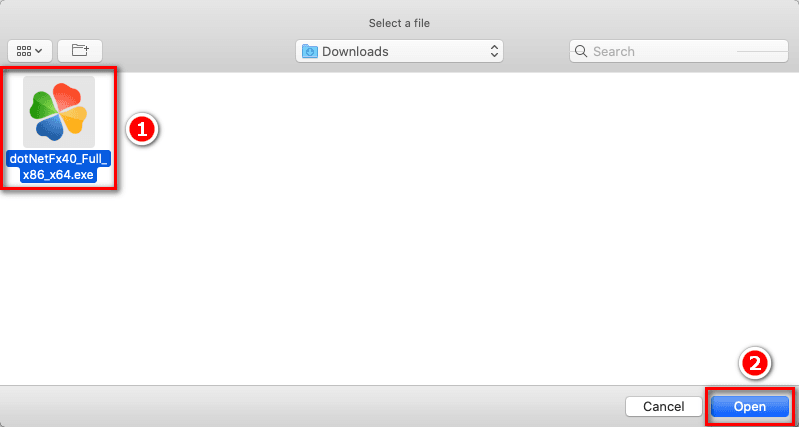
13.6.4. Select downloaded file and click Open. Follow the instructions in the .NET Framework 4.0 installer wizard and wait for the installation to complete.
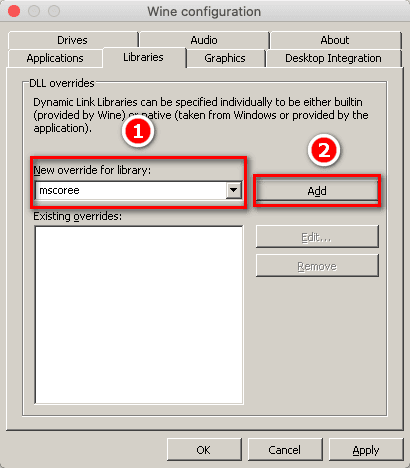
13.6.5. Select Libraries tab in the Wine configuration window, add a new override for library mscoree.
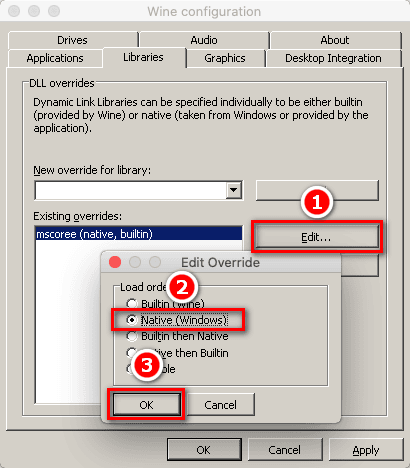
13.6.6. Select the new override in the Existing overrides field and click Edit. In the Edit override window select Native (Windows) option and click OK.
13.6.7. Click Apply.
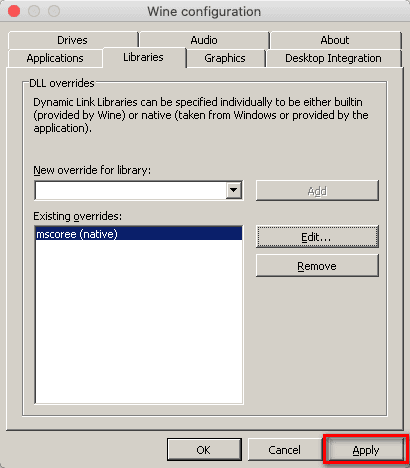
13.6.8. Select Applications tab in the Wine configuration window. Select Windows 7 or later Windows version and click OK.
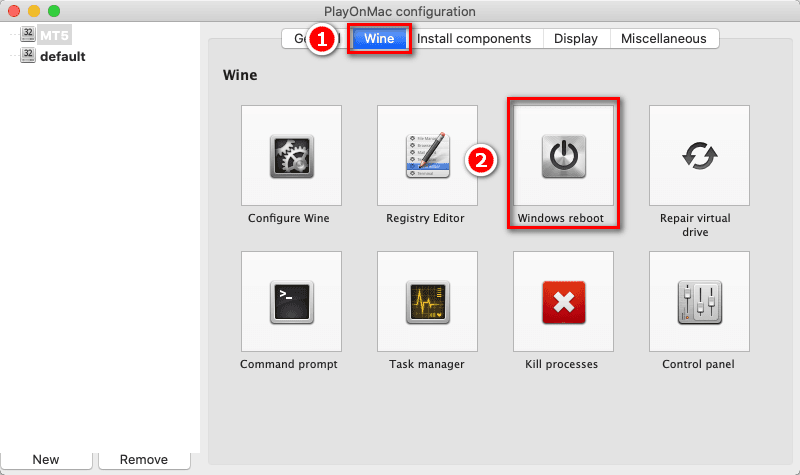
13.6.9. Download and run the .NET Framework 4.8 installer. Refer to sections 11.6.3 and 11.6.4 of this manual to learn how to run .exe files on a Wine virtual drive. Follow the instructions in the .NET Framework 4.8 installer wizard and wait for the installation to complete. Allow restarting Windows or restart it manually by clicking Reboot Windows on the Wine tab in the PlayOnMac configuration window.
13.7. Install MetaTrader 5 to your Wine virtual drive if not installed. Refer to sections 11.6.3 and 11.6.4 of this manual to learn how to run .exe files on a Wine virtual drive. Follow the instructions in the MetaTrader 5 installer wizard and wait for the installation to complete.
13.8. Download and run the CONNECTOR installer. Refer to sections 11.6.3 and 11.6.4 of this manual to learn how to run .exe files on a Wine virtual drive. Follow the instructions in the CONNECTOR installer wizard and wait for the installation to complete.
